
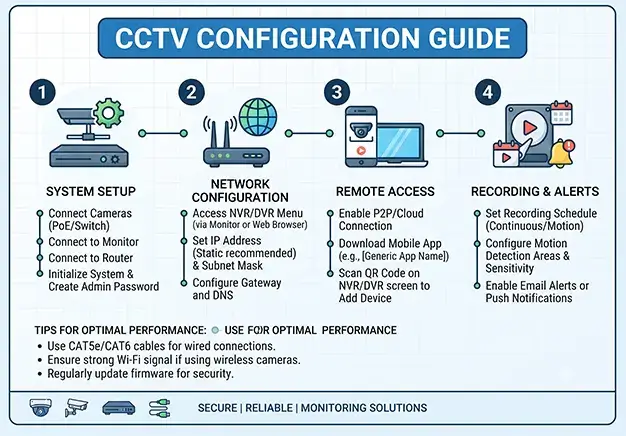
To configure a CCTV system, initialise your NVR via a monitor. Assign unique static IP addresses to each camera. This prevents network conflicts. Once connected, finalise the feed. Configure remote viewing access on mobile or desktop. Use your router’s port forwarding or secure cloud-based P2P settings.
This guide covers initialising the NVR. It details setting IP addresses. It also explains how to route the camera feed to your viewing devices.
Essential CCTV Testing Equipment
Before powering on your surveillance system, gather your essential hardware. You need an NVR or DVR to record data. You need a PoE (Power over Ethernet) switch to power the cameras. High-quality Ethernet cables are required for steady data transmission. Finally, you need a router with an active internet connection.
Ensure you have your equipment ready to avoid installation delays
- NVR/DVR: The primary recording unit.
- PoE Switch: Powers your IP cameras via network cables.
- Ethernet Cables: Cat5e or Cat6 cables for data and power.
- Router: Must have an active internet connection.
Step 1: Network Setup & IP Addressing
Proper IP assignment is a cornerstone of modern CCTV technology. Follow these steps to configure your network foundation:
- Choose Static IP Over DHCP: By default, your router uses DHCP to assign IP addresses automatically. Do not use this for your NVR or cameras. Change the settings to a Static IP. This ensures your devices keep the exact same network address permanently.
- Match the Subnet Mask: Ensure your NVR and cameras use the exact same Subnet Mask as your local network. For most home and office setups, this value is 255.255.255.0.
- Configure the Default Gateway: Enter your router’s local IP address as the Default Gateway in your NVR settings. This allows the system to communicate outside your local network for remote viewing.
Step 2: Optimising NVR/DVR System Settings
Once your network is stable, log into your recording unit to optimise the core software parameters. Begin by formatting the hard drive to clear any factory partitions and ensure optimal read/write storage cycles. Next, navigate to the recording schedule menu to select between continuous 24/7 recording or motion-triggered capture to save drive space. Finally, adjust the video compression codec to H.265 to maximise storage efficiency and lower bandwidth usage without degrading camera resolution.
Formatting the Hard Drive
Your NVR cannot save any video footage until the internal hard drive is initialised. Navigate to the storage management menu in your system settings. Select the installed HDD and click the Format option. This process clears the drive and sets up the required file system for secure, continuous recording loops.
Setting NTP (Network Time Protocol)
Accurate time tracking is a strict legal requirement for surveillance footage. Enable NTP in your NVR settings and link it to a reliable public time server. This automatically syncs your system clock and prevents time drift. Correctly timestamped video is vital if you need to use the footage as valid evidence in a court of law.
Configuring Motion Detection & Schedules
Motion-triggered recording saves vast amounts of storage space. Open the camera motion menu and select the grid setup tool. Mask out high-traffic zones like public pavements or swaying trees by clearing those specific grid squares. This ensures the system only records true security events and eliminates false alerts.
Step 3: Configuring Remote Viewing Devices
Once your NVR is online via P2P (Peer-to-Peer) or Port Forwarding, you must configure the viewing endpoints to access the live stream. This routing hub phase links your secure network infrastructure directly to your personal hardware. You will install the manufacturer’s dedicated application on your smartphone, tablet, or desktop computer to bridge the gap between the recorder and your display screen.
Mobile Phone & Tablet App Configuration
Connecting your system to a mobile device requires minimal network knowledge thanks to P2P cloud architecture. Download your manufacturer’s official application, such as Hik-Connect or DMSS, from your mobile app store. Open the app, create a secure account, and select the add device option to launch your smartphone’s camera. Scan the unique P2P QR code found on the NVR screen or physical chassis to instantly link the live feed to your device without complex router modifications. It is that simple to configure on mobile.
PC & Laptop Software (VMS) Configuration
For desktop access, you can install specialised VMS (Video Management Software) or use a standard web browser. To configure on laptop or desktop units, enter your NVR’s static IP address directly into the browser’s address bar while connected to the local network. Alternatively, run the VMS software to auto-discover and manage multiple camera feeds on a single, high-resolution monitor interface.
Smart TV & Local Monitor Setup
A direct HDMI cable connection offers the lowest latency and highest resolution for local display monitors. However, modern networks also allow you to configure smart TV setups without trailing wires. You can install native casting applications or dedicated surveillance apps directly on your television to stream the NVR feed securely over your home Wi-Fi network.
Securing Your CCTV System
An internet-connected surveillance system requires strict cybersecurity protocols to safeguard your privacy. You must change the factory-default admin username and password immediately during the initial boot process to prevent unauthorised access. Additionally, regularly update the firmware on your NVR and IP camera to patch known software vulnerabilities. Implementing these basic security steps hardens your network against hacking attempts and ensures your data remains secure.
Professional CCTV Setup & Configuration in London
Protect your property with a professionally optimised surveillance network. If port forwarding, IP conflicts, or firewall rules are too frustrating, our London engineers provide full configuration and handover services. We eliminate the guesswork by handling the technical deployment from start to finish. Contact our expert team today to secure your commercial or residential property with a reliable, engineer-certified installation. We are your trusted partner for premium CCTV installation in London.