
TV aerial and satellite installation covers both aerial setup and satellite dish alignment for signal reception. This guide explains how to install TV aerial systems and how to install a satellite dish using a clear step-by-step approach. It includes positioning, mounting, cable routing, and signal tuning for stable viewing. The process requires correct tools such as a signal meter, drill, brackets, and coaxial cables, along with safe ladder use and secure roof access. DIY aerial installation and satellite dish setup depend on accurate alignment and proper fixing, if safety and height conditions allow controlled working.
What You Need Before Installing
TV aerial and satellite installation requires proper planning before any physical setup begins. Installation planning defines signal quality, equipment suitability, and mounting accuracy. Location assessment identifies the best position with minimal obstruction from buildings or trees. Signal availability must be confirmed to determine whether an aerial or satellite dish is required. Property type, such as house or flat, affects mounting options, cable routing, and permission requirements.
The preparation stage also includes selecting the correct tools and equipment for installation. Standard aerial requirements and satellite setup preparation involve brackets, wall mounts, coaxial cables, connectors, a signal meter, and drilling tools. Safe access equipment, such as ladders and stabilisers, ensures controlled working conditions. Proper planning reduces installation errors and ensures stable signal reception.
How TV Aerial and Satellite Signals Work
TV aerial signals receive terrestrial broadcasts from ground transmitters. Satellite signals come from orbiting satellites in space. A TV aerial works by capturing signals from a nearby transmitter. It must face the correct transmitter direction for stable reception. Signal strength changes with distance, height, and obstacles.
A satellite dish works by receiving signals from space. The dish reflects the signal to the LNB for processing. It requires a clear line of sight to the satellite. Buildings or trees can block the signal. This explains aerial vs satellite signal and terrestrial vs satellite TV clearly.
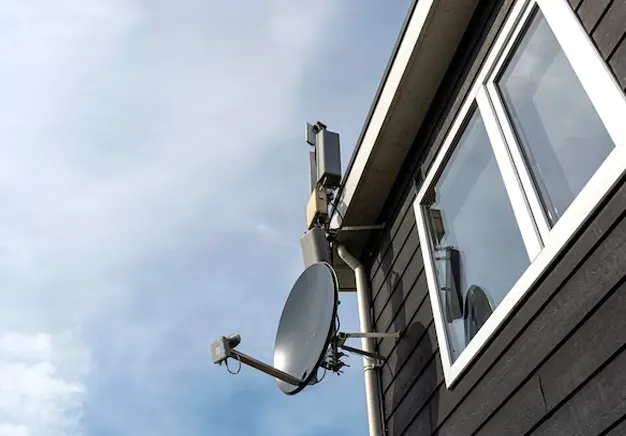
How to Install a TV Aerial
TV aerial installation involves mounting and aligning an aerial to receive terrestrial TV signals. This process suits DIY users with basic tools and safe access conditions. A TV aerial installation guide includes selecting the correct mounting point, such as the roof, loft, or external wall, based on signal strength and property layout. Roof installations provide maximum signal exposure, while loft and wall options suit areas with strong signal availability. A DIY aerial setup depends on correct positioning, secure fixing, and accurate alignment towards the transmitter.
Choosing the Right Aerial Location
The best location for a TV aerial depends on signal strength, height, and obstruction levels. Roof installation provides the strongest signal due to maximum height and clear exposure. Loft installation is safer and easier to access, but it gives weaker signals due to roof materials. Wall installation offers a balanced option with moderate height and easier maintenance.
Aerial placement must avoid obstructions such as buildings, trees, and metal structures. Higher positions improve signal reception and reduce interference. This makes height a key factor when deciding where to install a TV aerial.
Mounting the Aerial Securely
Mounting a TV aerial requires secure fixing using brackets and a stable aerial pole. Aerial mounting involves installing wall brackets or chimney mounts to hold the pole firmly in position. The aerial is then attached to the pole at the correct height and angle. Stability is essential to resist wind movement and prevent signal loss.
Secure antenna mounting depends on strong fixings, correct bracket spacing, and a solid wall or chimney structure. Loose fittings can cause misalignment and poor reception. Safety is critical during aerial bracket installation, especially when working at height or on roofs.
Aligning the Aerial to the Transmitter
Aligning a TV aerial requires the correct direction towards the nearest transmitter. TV aerial direction determines signal strength and picture quality. The aerial must face the exact transmitter direction to receive stable terrestrial signals. Initial alignment can be done using local transmitter data.
Aerial alignment is refined using a signal meter or the TV signal menu. Fine-tuning involves small adjustments to improve signal strength and quality readings. Accurate positioning ensures consistent reception and reduces pixelation or signal loss.
Connecting the Cable to Your TV
Connecting the TV aerial cable ensures the signal reaches your TV correctly. The coaxial cable runs from the aerial to the TV or set-top box. Proper connection prevents signal loss and interference. After connecting, check signal strength using the TV signal menu or a signal meter. Fine-tune the aerial angle if needed to maximise picture quality. Secure all connections to maintain stable reception over time.
Tuning Your TV Channels
Tuning your TV channels starts by opening the TV settings and selecting the auto-scan option. The TV searches for all available digital channels and stores them for easy access. Signal strength affects reception stability, while signal quality affects picture and sound clarity.
If some channels are missing or pixelated, retune the TV or adjust the aerial slightly. Regular channel scans ensure the broadcast setup stays updated with new or relocated channels.
How to Install a Satellite Dish
Satellite dish installation requires higher precision compared to a TV aerial. The dish must be positioned accurately to receive signals from orbiting satellites. Clear line of sight is essential, as obstructions like trees or buildings can block reception.
A proper satellite dish installation guide covers mounting, dish alignment, LNB setup, and signal calibration. A DIY satellite setup is possible with careful measuring and the right tools, but precise positioning ensures stable, high-quality signal reception.
Selecting the Right Dish Location
Choosing the right satellite dish location is essential for clear reception. The dish must face the correct satellite direction, usually south-facing in the UK, to maintain signal visibility. Obstructions such as trees, buildings, or chimneys must be avoided, as they block the line of sight.
Roof installations offer maximum height and fewer obstructions, while wall mounting provides easier access but may reduce signal strength. Proper satellite positioning ensures stable reception and reduces the need for frequent adjustments.
Mounting the Satellite Dish
Mounting a satellite dish requires secure fixing using wall brackets or roof mounts. The dish must be level and firmly attached using strong fixing bolts to prevent movement. Stability is critical, as even small shifts can disrupt the signal.
Proper satellite dish mounting ensures the dish remains aligned with the satellite, even in strong winds. Secure mounting during outdoor installation protects both the equipment and property while maintaining consistent reception.
Installing and Positioning the LNB
The LNB (Low Noise Block) converts satellite signals into a form your receiver can process. It is mounted at the end of the dish arm, pointing directly at the satellite’s signal reflection. Correct LNB positioning ensures maximum signal strength.
Adjusting the LNB skew angle fine-tunes reception for optimal quality. Proper LNB installation improves signal reception and frequency conversion, reducing pixelation and signal dropouts.
Aligning the Satellite Dish
Aligning a satellite dish requires setting the correct azimuth and elevation to point at the satellite. Azimuth is the horizontal angle, and elevation is the vertical tilt of the dish. Precision is crucial, as small errors can cause signal loss. Use a signal meter or the receiver’s signal menu to monitor strength while adjusting. Fine-tuning the dish ensures a stable reception and high-quality picture and sound.
Connecting the Satellite Receiver
Connecting a satellite receiver starts by linking the dish cable to the receiver’s coaxial input. Then connect the receiver to the TV using an HDMI cable for high-quality video and audio. Finally, power on the receiver and TV, ensuring the receiver is correctly set to the satellite input. Proper satellite box setup ensures a stable signal input and seamless viewing.
Scanning and Activating Channels
Scanning and activating channels involves using the receiver to search for available satellite broadcasts. The process stores all channels in the system, whether using Freesat or Sky. After scanning, confirm that the signal is working and the channels display correctly. Regular scans ensure the channel list stays updated and the satellite broadcast is received reliably.
Tools and Equipment Required
Tools and equipment are essential for a successful TV aerial and satellite installation.
- Tools: A drill is needed for mounting brackets on walls or chimneys. A ladder provides safe access to roofs or high walls. Spanners tighten bolts securely, and a signal meter helps check signal strength for accurate alignment.
- Equipment: A TV aerial or satellite dish captures signals, while the LNB converts satellite signals for the receiver. Coaxial cables carry the signal to your TV or wall plate, and mounting brackets or poles secure the aerial or dish in place.
Having the right tools and equipment ensures stable signal reception, safe installation, and reduces the risk of damage or misalignment.
Common Installation Mistakes to Avoid
Common installation mistakes to avoid during TV aerial and satellite setup include:
- Poor alignment: Incorrectly pointing the aerial or dish reduces signal strength.
- Loose mounting: Brackets or poles that aren’t secured can shift in the wind, causing signal loss.
- Using cheap or damaged cables: Low-quality coaxial cables cause interference and weak signals.
- Ignoring signal testing: Failing to check signal strength during installation can lead to missing channels or pixelation.
- Incorrect wiring: Misconnected cables or receiver inputs prevent proper signal transfer.
Avoiding these errors ensures stable reception, clear picture quality, and long-term system reliability.
Safety Tips for TV Aerial and Satellite Installation
Safety is critical during TV aerial and satellite installation. Always take precautions when working at height, whether on a roof or using a loft. Ensure ladders are stable and placed on even ground, and use fall prevention measures where possible. Avoid installation during bad weather, such as strong winds or rain, which increases the risk of slips and accidents. Electrical safety must be observed when working near power lines or connecting cables to prevent shocks or short circuits. Following these precautions ensures a safe and controlled installation process.
When to Call a Professional Installer
Calling a professional installer is recommended in situations where DIY installation is risky or complex. If roof access is unsafe, it is better to hire an expert. Persistent signal issues despite correct alignment indicate a need for professional troubleshooting. Multi-room setups or commercial systems require specialised equipment and knowledge. Even some residential systems may involve complicated wiring or combined aerial and satellite setups. Professional installation ensures safety, optimal signal quality, and long-term reliability.